10장 퀘스트 /9
Text Audio /1
| Type | 이름 | 수량 |
|---|---|---|
| Act 10 | 광신자 소책자 | 3 |
Community Wiki
Act 10
Act. 10 (around 20 minutes with minimal practice) - This act is pretty short! Even though it seems long, like most of the acts in the second part of the story.
This Act is SUPER Short, there's basically nothing to do here, this is also where we will complete our 3rd Lab and get ready for maps!
Head up to the "The Cathedral Rooftop" and go top-left, where Kitava's Boss Fight was in Act 5, you need to kill the mini-boss to help Bannon.
Head out and back the opposite way you did in Act 5, all the way through "The Cathedral Rooftop" into "The Ravaged Square".
In the Square, you want to HUG the LEFT wall from the entrance, this will lead you top-side to "The Control Blocks", where you kill Valentia for another Skill point.

Make sure to grab the Waypoint at the beginning of "The Control Blocks" or you will have to run-back the entire Rooftop.
Make your way through and kill Valentia. She is a VERY difficult encouter. Don't worry, just die as many times as needed to get her down. IF you're playing Hardcore, I would highly recommend you just SKIP that boss until much later.
Once Valentia is down, log out or portal out and take your waypoint back to "The Control Blocks".
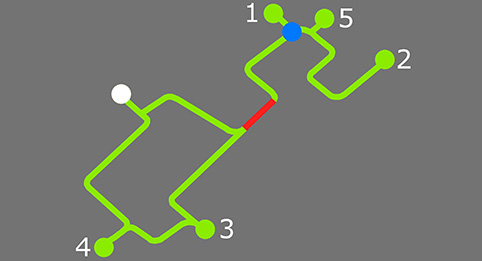
Head out back into "The Ravaged Square" and this time keep going left until you are forced downwards and go in a straight diagonal line towards the lower-middle of the layout. You want to find a bridge. The layout is always the same, it goes like this.
Once you found the bridge, go through left & forward until you reach the waypoint to "The Ravaged Square".
Head in "The Ossuary" and go straight forward to the very end of the layout and follow along the wall either left or right, depending on which side you entered on. You will find the final Trial of Ascendancy in the Story!
Once you have the Trial, logout and the the waypoint back to "The Ravaged Square". This time we're doing the opposite pathing that we did in Act 5.
The Layout is the EXACT same, but this time you are starting from the waypoint and heading TOWARDS the "enter".
Head through "The Torched Courts" and "The Desecrated Chambers", once again, those are the same as Act 5. At the very end of the Chambers, you will find Avarius, Kill him and don't forget to GRAB THE STAFF!


At this point, we're about to finish the story with Kitava, but when you kill Kitava, you get a big penalty to resistances, so it's a good idea to do your 3rd lab FIRST, so you don't get the Resistance Penalty!
Complete the Lab and in town, talk with all the NPCs and get all your Quest Rewards if you've missed any.
Head back to "The Ravaged Square" waypoint and next to it, Innocence will be waiting for you.
Make your way through "The Canals" and "The Feeding Trough", they are both basically straight lines, you can't really get lost.
Kill Kitava, you're done! Congradulations, you've beat the tutorial, now the real game begins!
Wikis Content is available under CC BY-NC-SA 3.0 unless otherwise noted.